The post Check Engine Light Blues: Navigating the Road Ahead appeared first on ELD Drive.
]]>Understanding the Check Engine Light
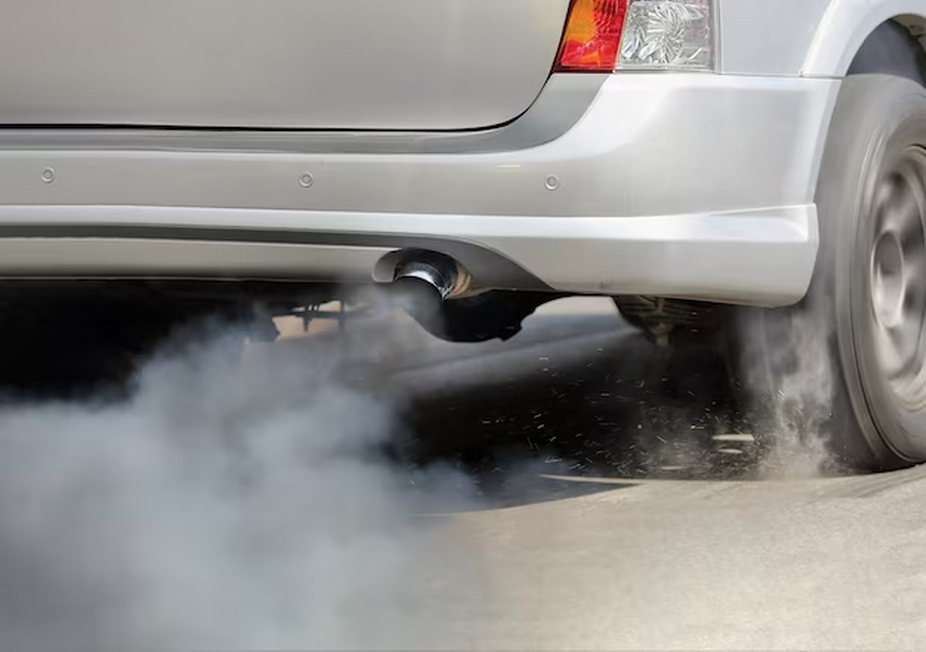
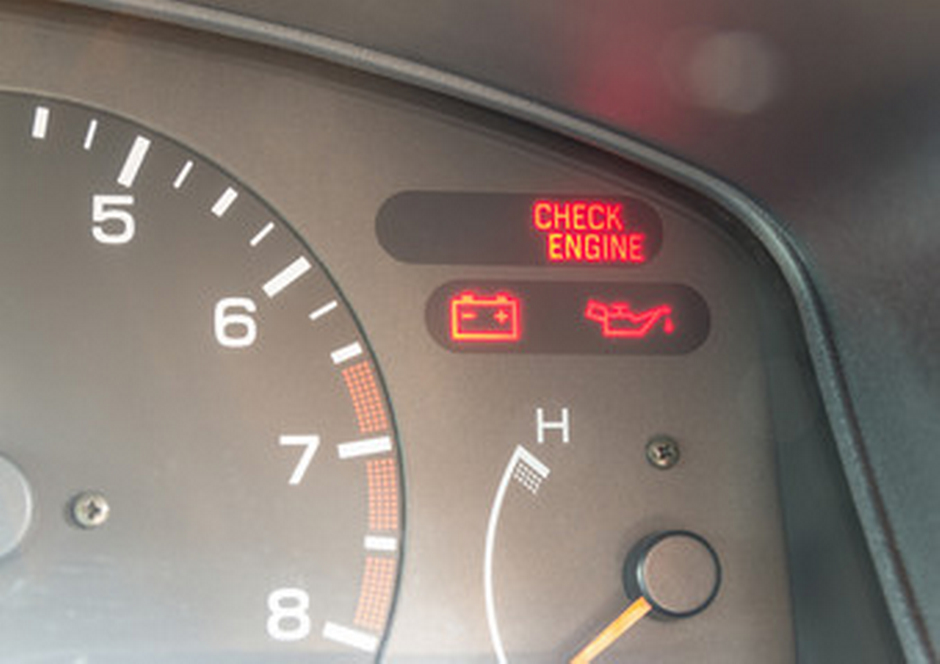
You must know what the check engine light means before you can explore the subject of how long you can drive with it on. Your car’s onboard diagnostics system includes it, and it can notify you if there’s a possible problem with your vehicle.
Many different things can cause the check engine light to come on. Some of these problems are small annoyances, while others, if ignored, might cause serious damage to the engine. The following are some of the most typical reasons why the check engine light comes on:
| Common Causes | Effects on the Vehicle |
| Loose Gas Cap | Simple issue, but can trigger the light. |
| Faulty Oxygen Sensor | Affects fuel efficiency and emissions. |
| Malfunctioning Catalytic Converter | Crucial for reducing harmful exhaust gases. |
| Bad Spark Plugs | Essential for proper engine ignition. |
| Mass Airflow Sensor Failure | Impairs the engine’s air-fuel mixture. |
Understanding these common triggers can provide valuable insights into the potential severity of the issue when the check engine light comes on. Now, let’s address the critical question:
The Big Question: How Long Can You Drive with the Check Engine Light On?

What caused the warning light to come on is a major factor in determining the complexity of the answer to this question. There are often two possible outcomes to think about:
If the Check Engine Light Is Flashing
- Immediate Attention Required: A malfunctioning engine, usually caused by a misfire in one or more cylinders, is the immediate cause of a warning light that is flashing. The catalytic converter is particularly vulnerable to harm by ignoring a flashing light, which can necessitate expensive repairs;
- Recommendation: Do not delay in responding to a flashing check engine light. You should not keep operating your car. Pull over to a safe area and switch off the engine instead. Tow your vehicle to the closest garage or repair shop as soon as possible. Under no circumstances should you drive while the check engine light is blinking.
If the Check Engine Light Is Steady
- Possible Minor Issue: Consistently illuminated check engine lights usually point to a less serious issue. You shouldn’t disregard it just because it doesn’t need fixing right now;
- How Long Can You Drive?: If possible, get the problem checked out and fixed within a week after the dashboard light comes on. The underlying problem may develop with time if you drive with a constant check engine light, which could cause more serious difficulties down the road.
It’s worth mentioning that the check engine light is more of an early warning system than a diagnostic instrument. A diagnostic scan tool or a skilled mechanic can scan your vehicle’s onboard computer system to identify the precise problem causing the light to come on. You can find the source of the problem with the help of the precise error codes provided by this.
What To Do When the Light Comes On
The Check Engine light, an ever-watchful sentinel on your car’s dashboard, can provoke unease and doubt as it abruptly becomes clear. It’s a warning that something is wrong with the engine, and you need to know what to do to keep your car in good repair and your money in your pocket. When the Check Engine light comes on, we’ll go over what to do in this section:
Check for Immediate Issues
Do not freak out if the Check Engine light unexpectedly comes on. Checking for obvious issues, such as a loose gas cap, should be your first step:
- Inspect the Gas Cap: Open the fuel door and check that the gas cap is tight. A broken or unsecured gas cap is one possible cause of the Check Engine light to come on;
- Tighten or Replace: If the gas cap is loosened or broken, you can either tighten it or get a new one. Since the system may need some time to reset, it’s recommended to drive for a few days to check whether the light goes out.
Use a Diagnostic Scanner
In the event that you have already checked the gas cap and still suspect a more complex problem, a diagnostic scanner will be your savior:
- Purchase or Borrow a Diagnostic Scanner: Get a diagnostic scanner—buy one or borrow one: Visit a business that sells auto components or ask around at local repair shops to borrow a diagnostic scanner;
- Locate the OBD-II Port: The Onboard Diagnostics II (OBD-II) port is usually located under the dashboard, next to the steering column. Find it. To find the exact spot, look in your handbook;
- Plug in the Diagnostic Scanner: Turn on the ignition key (not the engine key) and insert the diagnostic scanner into the vehicle’s OBD-II port;
- Retrieve Error Codes: To get the problem codes out of your car’s computer, follow the scanner’s directions. Important information regarding the issue that caused the Check Engine light to come on is provided by these codes;
- Research Error Codes: Either write down the error codes or snap a photo of the scanner’s screen. To learn more about the nature of the problem and possible solutions, use these codes to conduct internet research on the subject or refer to your vehicle’s repair manual.
Consult a Professional
Sometimes, the error codes could indicate a serious problem that needs expert help:
- Safety Concerns: Because of the seriousness of the situation, you should not delay in obtaining expert assistance if the Check Engine light is displayed alongside other warning lights, such as oil or temperature warnings;
- Unclear Diagnosis: Seek the advice of a qualified mechanic if you are unable to ascertain the source or if the error codes indicate a serious issue. For precise diagnosis and repair of complicated difficulties, their knowledge and equipment are priceless;
- Emission Testing: In areas where emissions testing is mandatory, failing the test is possible if the check engine light is on. To make sure it complies with emission rules, a mechanic can find the problem and fix it.
Potential Risks of Ignoring the Light
You should not ignore the Check Engine light because doing so can cause a number of problems:
- Increased Emissions: Unresolved problems can lead to increased emissions, which in turn can increase air pollution and lead to possible violations of environmental standards;
- Poor Fuel Efficiency: Reduced fuel efficiency can make you spend more money at the gas station if you choose to ignore the light;
- Major Engine Damage: Ignoring what seems like a small problem at first might cause serious damage to the engine, necessitating expensive repairs or perhaps a replacement of the engine.
Maintenance Tips to Avoid Check Engine Light Issues
To stay ahead of that pesky Check Engine light, prevention is usually key:
- Regular Oil Changes: Change the oil in your car according to the manufacturer’s recommended schedule for the best engine performance;
- Check and Replace Spark Plugs as Needed: Spark plugs that are too worn out might reduce engine efficiency and cause the Check Engine light to come on. It is advised that you replace them;
- Ensure Proper Gas Cap Sealing: Never let fuel vapors escape from your gas cap, as this could cause the Check Engine light to come on;
- Regularly Replace Air and Fuel Filters: basis. Clogged filters reduce engine performance. When replacing the filter, be sure to follow the manufacturer’s instructions.
Conclusion
When pondering “How long can I drive with the check engine light on?” remember it’s a signal not to be ignored. Timely action can save you from hefty repair bills and keep your car running smoothly. Always consult with a professional for accurate diagnostics and repairs.
FAQ
May I operate my vehicle while the check engine light is illuminated?
Yes, but it is advisable to have it inspected immediately in order to prevent potential damage.
How long can the check engine light remain illuminated before a serious problem develops?
It is ideal to have it inspected within a week; however, if the light is blinking, immediate attention is required.
Can a lengthy distance be traveled safely while the check engine light is illuminated?
To prevent breakdowns during lengthy distances, it is advisable to have the problem diagnosed beforehand.
What is the most frequent cause of the check engine light illuminate?
Frequent causes include loose gas lids, malfunctioning oxygen sensors, and spark plug problems.
The post Check Engine Light Blues: Navigating the Road Ahead appeared first on ELD Drive.
]]>The post Right-Side Road Rules in France: A Detailed Guide appeared first on ELD Drive.
]]>Understanding the French Way: Driving on the Right
In France, like in many other countries, the rule is to drive on the right-hand side of the road. This standard is crucial for traffic harmony and safety. Here’s a breakdown of what you need to know:
| Topic | Information |
| General Rule | The primary rule to remember when driving in France is to stay on the right side of the road. This applies to all types of roads, from narrow village streets to broad city boulevards. |
| Traffic Flow | The flow of traffic in France follows a right-hand rule, meaning that vehicles keep to the right side of the road. This ensures consistency and predictability on the road, reducing the risk of accidents. |
| Lane Discipline | When driving on multi-lane roads, it’s crucial to maintain lane discipline. The right lane is generally for normal driving, while the left lane is reserved for overtaking slower vehicles. |
City Streets in France
When navigating the bustling streets of French cities, understanding the right-side driving rule is of utmost importance:
- Intersections: At intersections, priority is usually given to the vehicle approaching from the right. So, if you arrive at an intersection simultaneously with another vehicle, yield to the right;
- Roundabouts: In roundabouts, vehicles inside the circle have the right of way. Approach the roundabout from the right, yield to circulating traffic, and indicate your exit;
- Parking: Park your vehicle on the right side of the road unless otherwise indicated by road signs or markings.
Rural Roads and Countryside Driving
Driving on the right remains consistent when you venture onto the quieter roads of the French countryside:
- Narrow Roads: Many rural roads in France can be quite narrow. In such cases, prioritize allowing oncoming traffic to pass safely by keeping to your right;
- One-Way Streets: Be aware of one-way streets, often found in small villages. Follow the direction indicated, and remember to drive on the right side of the road;
- Farm Vehicles: On rural roads, you may encounter farm vehicles, so exercise caution and yield the right of way when necessary.
Driving on French Motorways and Highways
French motorways, known as “autoroutes,” are well-maintained and efficient. When traveling on these high-speed roads:
- Entrance and Exit Ramps: Use entrance ramps to merge onto the motorway while staying on the right. Similarly, when exiting, follow the signs and use the right-most lane for your exit;
- Overtaking: Overtake slower vehicles by moving to the left lane, but always return to the right lane once you have passed. The left lane is not for cruising; it’s for overtaking only;
- Rest Areas and Services: Rest areas and service stations are typically well-marked on motorways, making it easy to access facilities while maintaining right-side driving.
The Historical Perspective
The tradition of driving on the right side of the road can be traced back centuries in France. Its origins are not only practical but also deeply rooted in history. Several factors contributed to the adoption of this practice:
- Medieval Tradition: In medieval Europe, jousting tournaments were popular events. Knights, who predominantly used their right hand (the dominant hand) for combat, preferred to ride on the left side of the road. This allowed them to have their right hand free for protection and to engage in combat effectively;
- Pre-Revolutionary France: Before the French Revolution (1789-1799), road usage in France was highly unregulated. However, the majority of travelers preferred to ride on the right side due to the influence of medieval traditions and the fact that most people were right-handed;
- Napoleon’s Influence: Napoleon Bonaparte played a significant role in standardizing right-side driving in France. During his rule (1799-1814), he implemented several road regulations, including the requirement for carriages to drive on the right. This further cemented the practice.
The Paris Convention of 1909
While right-side driving was already customary in France, it was the Paris Convention of 1909 that formalized and standardized this practice. The convention, also known as the “Convention relative to the Regulation of Motor Traffic,” aimed to establish international standards for road traffic.
Table: Key Points of the Paris Convention (1909)
| Point | Description |
| Article 2 | Defined that traffic should keep to the right side of the road, aligning with France’s existing practice. |
| Article 8 | Established that vehicles approaching from the right have the right of way. |
| Article 9 | Required the installation of traffic signs and signals for road safety. |
| Article 15 | Outlined rules for overtaking other vehicles, emphasizing the importance of visibility and caution. |
Impact and Significance
The Paris Convention of 1909 had a profound impact not only on France but also on many other countries. It set a precedent for right-side driving, which was gradually adopted by numerous nations. The convention’s key principles, such as driving on the right and yielding to vehicles on the right, remain integral to modern road safety regulations worldwide.
Understanding this historical context is crucial for answering the question, “What side of the road do they drive on in France?” It sheds light on the evolution of road traffic regulations and the cultural and practical factors that have influenced this practice over the centuries.
Road Signage and Lane Discipline

In France, road signage and lane discipline are essential aspects of ensuring safe and orderly traffic flow. These elements are designed with right-side driving in mind, and understanding them is crucial for both residents and tourists. Here’s a detailed look at how road signage and lane discipline impact driving in France:
Multi-Lane Roads
On multi-lane roads in France, drivers adhere to specific lane discipline rules:
- Rightmost Lane: The rightmost lane is designated for regular driving at a moderate speed. It is primarily used by vehicles traveling at or near the speed limit;
- Left Lanes: The left lanes are typically reserved for overtaking slower-moving vehicles. These lanes are used to pass vehicles in the right lane or those traveling below the speed limit. Overtaking is an essential part of maintaining smooth traffic flow on multi-lane roads;
- Reversible Lanes: In some urban areas with heavy traffic, reversible lanes may exist. These lanes can change direction depending on the time of day to optimize traffic flow. Drivers should be cautious and follow lane direction indicators during these changes.
Right of Way in Roundabouts
Roundabouts are a common feature of French road networks. When approaching a roundabout, it is crucial to understand the right of way:
- Inside Traffic: Vehicles already inside the roundabout have the right of way. If you are entering a roundabout, you must yield to traffic already circulating within it;
- Indicator Signals: To indicate your intentions, use your vehicle’s turn indicators when approaching and exiting a roundabout. Signal right when exiting.
Road Signage in France
French road signs play a pivotal role in ensuring road safety and guiding drivers. They are designed to be clear and easily comprehensible, even for international visitors. Here are some key aspects of road signage in France:
| Road Sign Categories | Description |
| International Signage Standards | France adheres to international standards for road signs, using familiar symbols and colors. For instance, stop signs are octagonal and red, while yield signs are triangular with a red border. |
| Directional Signs | Green signs indicate directions to cities and towns. Distances are typically given in kilometers. Blue signs provide information about services like rest areas, gas stations, and tourist attractions. |
| Regulatory Signs | These signs inform drivers about specific rules and regulations. Examples include speed limit signs, no-entry signs, and parking restrictions. |
| Warning Signs | These signs alert drivers to potential hazards ahead, such as curves, intersections, and pedestrian crossings. They are typically yellow with black symbols. |
| Informational Signs | These signs provide useful information, such as distance markers, route numbers, and road names. |
| Exit Signs | On highways and major roads, exit signs indicate upcoming exits and the destinations they lead to. Pay close attention to these signs to ensure you exit at the correct location. |
| Toll Booth Signs | If you are traveling on a toll road, follow signs indicating the approach to toll booths. Ensure you have the necessary payment method ready, as some toll booths may not accept cash. |
Right-Side Driving and Safety
Safety is of utmost importance when driving, and adhering to the right-side driving rule is a fundamental aspect of road safety in France. Here, we provide detailed information and practical tips to ensure your safety and the safety of others while driving on the right side of the road in France.
Stay Vigilant
Driving on the right side can be a significant adjustment, especially if you’re accustomed to driving on the left. To enhance safety, consider these key points:
- Awareness: Always be conscious of the right-side driving rule. It’s essential to remain vigilant and maintain a continuous awareness of your position on the road;
- Visual Cues: Pay attention to road markings, signs, and other visual cues. They will help you stay on the correct side of the road, especially at intersections and roundabouts;
- Mirror Use: Make regular use of your mirrors to monitor traffic around you. This is crucial for safely changing lanes, merging, and maneuvering in traffic;
- Practice: If you’re not used to right-side driving, practice in a safe and less congested area before venturing into busier traffic.
Adapt to Local Practices
Understanding the nuances of how driving is conducted in France is essential for a safe and smooth driving experience. Consider the following:
- Intersections: In France, vehicles often yield to the right at intersections unless road signs or road markings indicate otherwise. Be prepared for this practice and give way to vehicles approaching from the right when applicable;
- Pedestrian Crossings: French drivers tend to be more cautious at pedestrian crossings, so always be prepared to stop and yield to pedestrians waiting to cross the road. Watch for zebra crossings and pedestrian signals;
- Roundabouts: As previously mentioned, vehicles inside a roundabout have the right of way. When entering a roundabout, yield to traffic already circulating within it. Indicate your exit using your vehicle’s turn signals.
Driving in France: Practical Tips
To ensure your safety while driving on the right side in France, consider the following practical tips:
- Renting a Car: If you’re renting a car, ensure that you are comfortable with a right-hand drive vehicle. Take some time to get acquainted with the car’s controls and driving position before hitting the road;
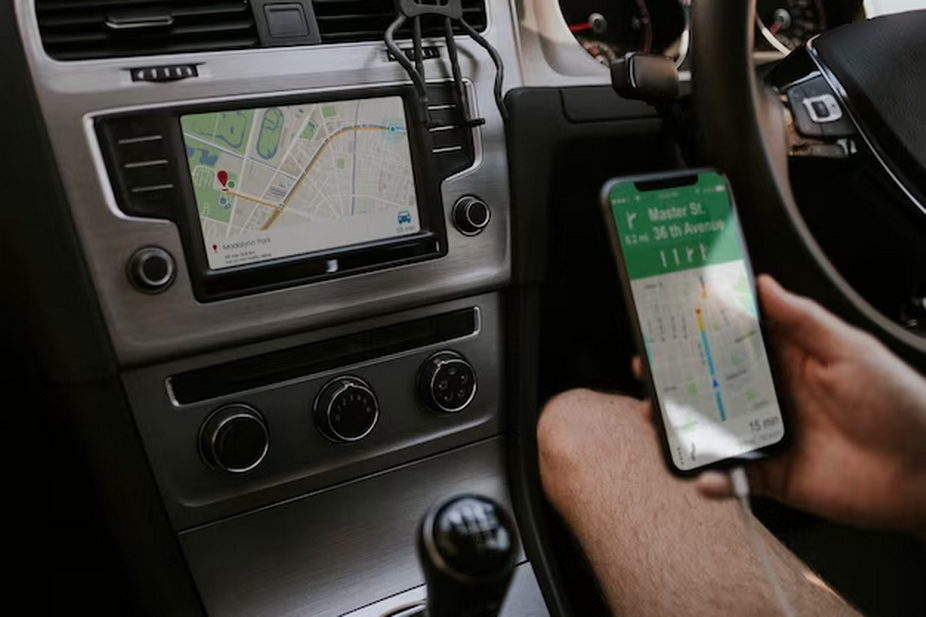
- GPS and Navigation: Modern GPS systems are invaluable tools for navigation in a foreign country. Ensure your GPS is set to provide instructions for right-side driving. This will help you stay on course and navigate effectively;
- Parking: Parking rules and arrangements are designed in accordance with right-side driving in France. Pay attention to road signs and markings, and be mindful of parking regulations to avoid fines or inconvenience.
Conclusion
Understanding what side of the road to drive on in France is more than just a rule; it’s an integral part of safely navigating and enjoying the beautiful French roads. Whether you’re exploring the countryside or navigating the busy streets of Paris, remembering to drive on the right side is key to a smooth and enjoyable experience.
This guide has aimed to provide thorough insights into the question, “What side of the road do they drive on in France?” By now, you should feel confident about driving in France, equipped with the knowledge and tips for a safe journey. Remember, when in France, right is right!
FAQ
Q: What side of the road do they drive on in France, especially in rural areas?
A: Regardless of urban or rural settings, the rule is to drive on the right side.
Q: For a British driver, what are the key adjustments when driving in France?
A: The most significant change is adapting to driving on the right side of the road. It’s also important to get used to right-hand drive vehicles.
Q: How does right-side driving in France affect tourists from right-side driving countries?
A: Tourists from countries where driving is on the right side will find French roads quite familiar. However, awareness of local traffic rules and signs is still crucial.
Q: What side of the road do they drive on in France compared to its neighbors?
A: Most of France’s neighbors, including Germany, Spain, and Italy, also drive on the right side, ensuring consistency across borders.
Q: Are there any exceptions to the right-side driving rule in France?
A: No, the right-side driving rule is universal across France.
The post Right-Side Road Rules in France: A Detailed Guide appeared first on ELD Drive.
]]>The post Demystifying the Peterbilt Diagnostic Port: Your Go-To Guide appeared first on ELD Drive.
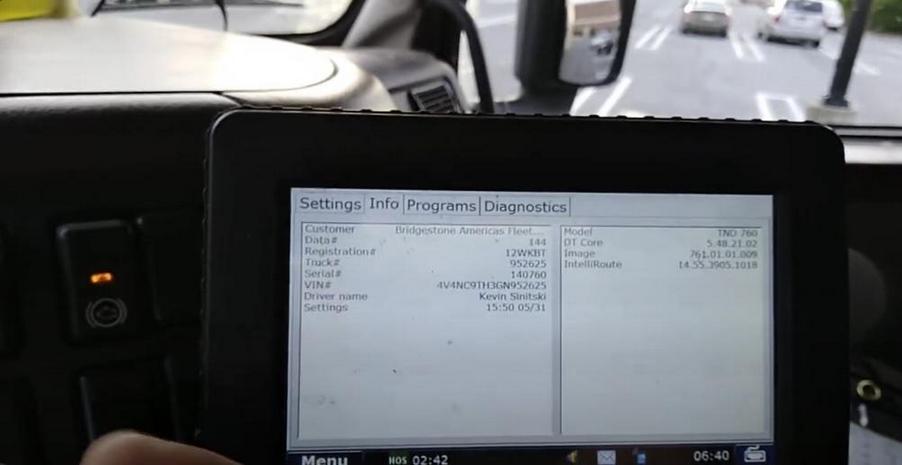
]]>Understanding the Peterbilt Diagnostic Port
The diagnostic port in a Peterbilt truck, similar to the Kenworth diagnostic port, is essentially the communication gateway for diagnostic tools and the truck’s electronic control modules (ECMs).
Key Features
- Accessibility: Located typically below the dashboard;
- Compatibility: Works with standard diagnostic tools, much like the Kenworth diagnostic port;
- Functionality: Enables reading and clearing of diagnostic trouble codes (DTCs).
Technical Specifications
- Port Type: J1939 9-pin connector, resembling the Kenworth diagnostic port;
- Data Protocol: Supports various protocols including CAN, J1587/J1708.
Diagnostic Tools Compatible with Peterbilt Diagnostic Ports
For Peterbilt trucks, there are several diagnostic tools available that are compatible with their diagnostic ports. These tools are not only suitable for Peterbilt trucks but also for other heavy-duty vehicles, offering a range of features that cater to different needs and preferences.
| Diagnostic Scanner | Features | Compatibility | Price | Pros | Cons |
| Peterbilt Diagnostic Scanner | Forced DPF regeneration, diagnostics, reading/erasing fault codes, live data graphing, EVAP and O2 sensor tests, oil light reset, ABS testing. Covers a range of ECU systems. | Engine, transmission, instrument panel, drivetrain, braking system, EPS, ESP, fuel system, among others. | Not specified | Saves money and time by avoiding mechanic visits for certain issues. | Not specified |
| Cando HD Code II | DPF regeneration capabilities, user-friendly with a large screen, supports OBD II protocol. | Suited for commercial trucks (classes 4-8) and industrial engines. | $277 | Extends engine life by accurately defining error codes. | Limited to regenerations on specific engine models. |
| Universal Diesel Truck Diagnostic Tool Scanner | Laptop and scanner for diagnostics, Pocketfleet Diagnostics, Automatic VIN Decoder, KnowledgeBase. | Wide range of vehicle types, including Peterbilt. | $2,695 | Thorough diagnostics, access to extensive resources. | Relatively expensive and bulky. |
| Diesel Handheld Scanner | Portable, reads and clears diagnostic trouble codes, supports multiple protocols. | Various vehicles including Cummins, Detroit Diesel, Peterbilt. | $449.95 | Lifetime updates, easy to use for owner-operators. | Not specified |
| Diesel Tablet Commercial Truck Diagnostic System | Advanced features in tablet form, perpetual license software, stores history for multiple vehicles, easy navigation to repair information. | Range of vehicle types including Peterbilt. | $3,499 | Sleek design, suitable for Android users. | Not specified |
| FCAR F3-N Commercial Truck and Off-Highway Diagnostic Tool | User-friendly, straightforward interface, free unlimited software updates and support for two years. | Wide range of vehicles, including Peterbilt. | $2,995 | Fast diagnostic reads, effective for generating reports and viewing trip data. | Not specified |
Common Diagnostic Procedures
Understanding how to use the Peterbilt diagnostic port, just as one would with a Kenworth diagnostic port, is crucial for effective truck maintenance.
Steps for Diagnostic Testing
- Connect the Tool: The first step in conducting diagnostic testing on your Peterbilt or Kenworth truck is to plug your diagnostic tool into the diagnostic port. This port is typically located in the cab, accessible from the driver’s seat. Ensure that the tool is securely connected to establish a stable data link between the tool and the truck’s computer;
- Run Diagnostics: Once the diagnostic tool is connected, follow the tool’s instructions to initiate the diagnostic tests. Modern diagnostic tools are user-friendly and provide step-by-step guidance. Allow the tool to communicate with the truck’s systems and gather the necessary data;
- Interpret Results: After the diagnostic tests are complete, the tool will generate a list of diagnostic codes and data. Take the time to analyze these results carefully. Diagnostic codes are alphanumeric combinations that correspond to specific issues within the vehicle’s systems. Understanding these codes is crucial for identifying the source of the problem.
Troubleshooting Tips
While conducting diagnostic testing on your Peterbilt or Kenworth truck, you may encounter challenges or issues. Here are some troubleshooting tips to ensure a smooth diagnostic process:
- Ensure Proper Connection: Just like with the Kenworth diagnostic port, a proper connection to the Peterbilt diagnostic port is essential. If the tool is not securely connected, it may lead to communication errors or incomplete diagnostic tests. Double-check the connection to guarantee a stable link between the tool and the truck’s computer;
- Update Your Diagnostic Tool Software Regularly: Diagnostic tools often receive software updates to enhance their capabilities and compatibility with various truck models. Regularly updating your diagnostic tool’s software ensures that it can effectively communicate with the truck’s systems and interpret the latest diagnostic codes accurately;
- Consult the Truck’s Manual for Specific Diagnostic Procedures: Every Peterbilt and Kenworth truck model may have specific diagnostic procedures and nuances. To gain a deeper understanding of the diagnostic process for your particular truck, refer to the truck’s manual or documentation provided by the manufacturer. These resources can offer valuable insights into the diagnostic testing tailored to your vehicle.
The Role of the Peterbilt Diagnostic Port in Preventive Maintenance
Like the Kenworth diagnostic port, the Peterbilt port plays a pivotal role in preventive maintenance.
Preventive Maintenance Benefits:
- Early Problem Detection: Identifies potential issues before they escalate;
- Maintenance Scheduling: Helps plan routine maintenance effectively;
- Cost Savings: Reduces the likelihood of costly repairs.
Advanced Features of the Peterbilt Diagnostic Port
The Peterbilt diagnostic port, mirroring the capabilities of the Kenworth diagnostic port, offers several advanced features.
Noteworthy Features:
- Live Data Streaming: Real-time monitoring of truck’s performance;
- Historical Data Analysis: Access to past diagnostic data for trend analysis;
- ECM Programming: Ability to update or modify ECM settings.
Conclusion
The Peterbilt diagnostic port, akin to the Kenworth diagnostic port, is a vital component in modern truck maintenance. Understanding its functionality and proper use is key to ensuring the longevity and optimal performance of your Peterbilt truck. Regular use of the diagnostic port for preventive maintenance can save time, money, and ensure road safety.
FAQ
Q1: How is the Peterbilt diagnostic port different from the Kenworth diagnostic port?
A: While they share many similarities, there may be slight differences in software compatibility and location in the truck.
Q2: Can I use any diagnostic tool with the Peterbilt diagnostic port?
A: Most tools designed for heavy-duty trucks should work, but it’s best to check compatibility.
Q3: How often should I use the diagnostic port for maintenance?
A: Regular use, such as during routine maintenance checks, is recommended.
Q4: Can I perform ECM updates through the diagnostic port?
A: Yes, provided you have the appropriate tools and software.
The post Demystifying the Peterbilt Diagnostic Port: Your Go-To Guide appeared first on ELD Drive.
]]>The post Identifying Diagnostic Port Type appeared first on ELD Drive.
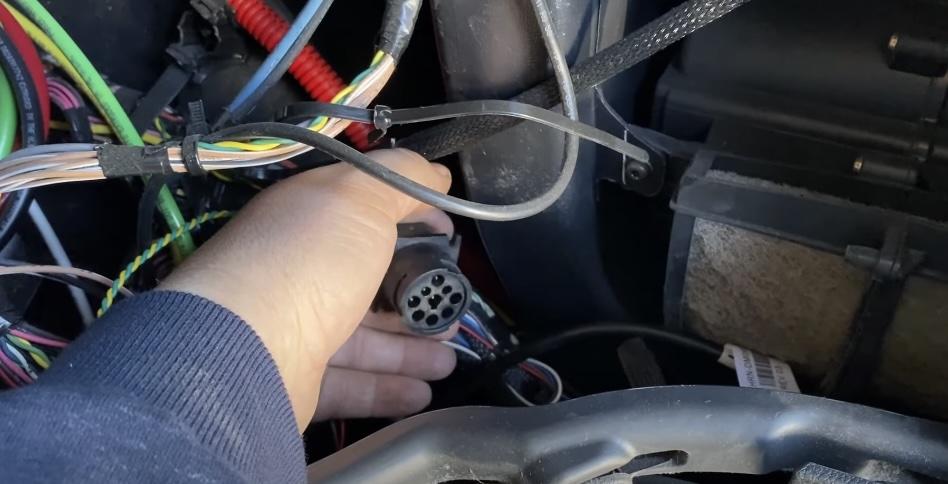
]]>The DriveELD package comes with a cable that connects the device to 9-pin (J1939) ports.
Diagnostic ports are generally located below the steering wheel on the left side. See common locations marked on the graphic.
Your truck’s engine type can also be used to find your diagnostic port. Below is a guide on how that works.
Vehicle Diagnostic Port Guide
| Make/Type | Year | Engine | Diagnostic Port |
| Freightliner | 2005 & older | All | 6-pin |
| 2006–2015 | All | 9-pin | |
| 2015 & newer* | All | 9-pin Type II (green) | |
| Kenworth | 2005 & older | All | 6-pin |
| 2005–2015 | All | 9-pin | |
| 2015 & newer* | All | 9-pin Type II (green) | |
| Peterbilt | 2005 & older | All | 6-pin |
| 2006–2015 | All | 9-pin | |
| 2015 & newer** | All | 9-pin Type II (green) | |
| International | 2006 & older | Cummins | 6-pin |
| 2006–2015 | Cummins | 9-pin | |
| 2005 & older | CAT | 6-pin | |
| 2005–2014 | CAT | 9-pin | |
| 2015 & newer* | All | 9-pin Type II (green) | |
| Volvo | 2000 & older | Volvo | 6-pin |
| 2001–2014 | Volvo | 9-pin | |
| 2014 & newer | Volvo | OBDII Plug (16-pin) | |
| 2006–2016 | Cummins | 9-pin | |
| 2016 & newer* | Cummins | 9-pin Type II (green) | |
| Mack | 2000 & older | Volvo | 6-pin |
| 2001–2014 | Volvo | 9-pin | |
| 2014 & newer | Volvo | OBDII Plug (16-pin) | |
| Western Star | 2006–2016 | Cummins | 9-pin |
| 2016 & newer* | Cummins | 9-pin Type II (green) | |
| 2010–2015 | All | 9-pin | |
| 2015 & newer* | All | 9-pin | |
| Light/Medium Duty Vehicle | 2008 & newer | All Diesel and Gas | OBDII Plug (16-pin) |
*Ensure that the diagnostics port on your truck does have a 9-pin connection
**Peterbilt and International trucks manufactored from 2017-2018 will require a special 9-pin cable
Navigating the Freightliner Diagnostic Port: A Comprehensive Guide
The Freightliner diagnostic port is a crucial component in modern truck maintenance and repair. Understanding how to use this port effectively can save time and money, ensuring that Freightliner trucks remain in top operating condition. This article provides an in-depth look into the Freightliner diagnostic port, its uses, and its importance in truck diagnostics.
What is the Freightliner Diagnostic Port?
The Freightliner diagnostic port, often referred to as the OBD-II (On-Board Diagnostics) port, is a standardized hardware interface in most Freightliner trucks. It’s typically located near the dashboard and allows for direct communication with the truck’s electronic systems. This port is used to connect diagnostic tools which can read and interpret error codes produced by the truck’s computer.
Uses of the Freightliner Diagnostic Port
- Troubleshooting: The primary use of the diagnostic port is for troubleshooting. When a Freightliner truck displays a check engine light or encounters operational issues, the diagnostic port becomes an essential tool for identifying the underlying problem.
- Maintenance Checks: Regular maintenance checks using the diagnostic port can help identify potential issues before they become major problems, thereby extending the life of the truck.
- Software Updates: The port can also be used for updating the truck’s software, ensuring that the vehicle runs on the latest version for optimal performance.
Accessing and Using the Port
- Location: The Freightliner diagnostic port is usually located under the dashboard, near the steering column. However, its exact position can vary depending on the model and year of the truck.
- Tools Required: To access the data from this port, a diagnostic scan tool or a code reader is required. These tools are designed to interface with the port and read the diagnostic codes generated by the truck’s computer system.
- Interpreting Codes: Once connected, the diagnostic tool retrieves error codes that can be interpreted to diagnose issues with the truck. This information is crucial for effective repair and maintenance.
Importance of the Freightliner Diagnostic Port
- Efficient Diagnostics: The diagnostic port allows for quick identification of problems, reducing downtime and repair costs.
- Preventive Maintenance: Regular diagnostics can help in preventive maintenance, catching issues before they lead to major breakdowns.
- Regulatory Compliance: For some models, the diagnostic port also helps in ensuring that the truck meets emission standards.
Conclusion
The Freightliner diagnostic port is a vital tool for modern truck maintenance and repair. Its ability to provide quick and accurate diagnostic information makes it an indispensable part of maintaining the health and efficiency of Freightliner trucks. Understanding how to access and use this port is essential for anyone involved in the maintenance, repair, or operation of Freightliner vehicles.
The post Identifying Diagnostic Port Type appeared first on ELD Drive.
]]>The post Navigating the Digital Highways: A Deep Dive into Rand McNally ELD Reviews appeared first on ELD Drive.
]]>Understanding Rand McNally ELDs
Rand McNally’s ELDs are designed to make life on the road easier and more efficient for truckers. They track hours of service (HOS), ensuring compliance with legal driving limits and helping to prevent driver fatigue. But what sets Rand McNally ELDs apart? Let’s break it down:
Key Features
Rand McNally ELDs stand out due to their impressive array of features tailored to meet the specific needs of truck drivers. These key features include:
| Feature | Description |
| User-Friendly Interface | Rand McNally ELDs are renowned for their intuitive design. The user-friendly interface makes it easy for drivers to navigate and utilize the device efficiently. This user-friendliness is particularly valuable for truckers who spend extended hours on the road and need a straightforward system to manage their logs. |
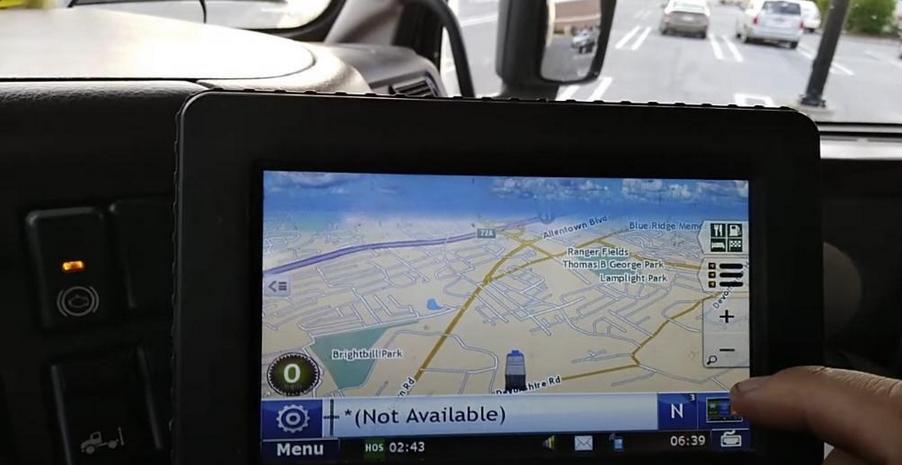
| Accurate GPS Tracking | Accurate GPS tracking is a cornerstone of Rand McNally ELDs. It provides real-time location information, which is crucial for route planning, efficient navigation, and overall fleet management. With precise tracking, drivers can optimize their routes, reduce fuel consumption, and minimize delivery times. |
| Reliable Data Recording | Rand McNally ELDs excel in reliable data recording. They automatically record and store essential information, including driving hours, rest breaks, and vehicle inspection reports. This functionality simplifies record-keeping and compliance, reducing the administrative burden on drivers and fleet managers. |
Benefits
Rand McNally ELDs offer a multitude of benefits to truck drivers and fleet managers, enhancing their operations in numerous ways:
- Compliance Ease: One of the primary advantages of Rand McNally ELDs is their ability to ensure compliance with HOS regulations. By accurately tracking driving hours and providing clear reports, these devices help drivers and fleet managers avoid costly violations and penalties. Compliance ease is crucial in an industry where adherence to legal driving limits is non-negotiable;
- Efficiency: Rand McNally ELDs streamline reporting and log-keeping processes. Drivers no longer need to rely on manual paperwork, reducing the risk of errors and saving valuable time. This increased efficiency translates into more time on the road, improved productivity, and ultimately, higher earnings;
- Safety: Safety is paramount in the trucking industry. Rand McNally ELDs play a pivotal role in promoting responsible driving habits. By tracking hours of service, they help prevent driver fatigue, reducing the likelihood of accidents caused by tired or overworked drivers. This safety aspect is not only beneficial for the drivers themselves but also for other road users.
Drawbacks
While Rand McNally ELDs offer an impressive range of features and benefits, it’s important to acknowledge potential drawbacks:
- Cost: Some trucking professionals have noted that Rand McNally ELDs come with a higher price point compared to other ELD solutions on the market. While the initial investment may be steeper, it’s essential to consider the long-term cost savings and benefits in terms of compliance, efficiency, and safety;
- Tech Support: Customer reviews on the responsiveness of Rand McNally’s tech support have been mixed. Some users have reported challenges in obtaining timely assistance when facing technical issues. However, it’s worth noting that experiences with tech support can vary, and improvements may have been made since these reviews were published.
Comparing Rand McNally ELDs with Competitors
In Rand McNally ELD reviews, comparisons with other market players are inevitable. How do they fare?
- Ease of Use: Rand McNally scores high for its user-friendly interface;
- Functionality: While robust, some users find competitor products offer more advanced features;
- Price: Generally higher, but many argue the quality justifies the cost.
Real-User Experiences: Rand McNally ELD Reviews
Real-world feedback is vital. Here’s what users say:
Positive Feedback
Users of Rand McNally ELDs have reported several positive aspects of these devices, highlighting their strengths in various key areas:
- Reliability: A common thread among user feedback is the reliability of Rand McNally ELDs. Many users praise the devices for their consistent performance and accurate data recording. The reliability of ELDs is crucial for ensuring compliance with HOS regulations and avoiding costly violations;
- Ease of Use: Rand McNally ELDs have garnered acclaim for their user-friendly interface. Truck drivers, who often work long hours on the road, appreciate the straightforward design that makes it easy to navigate and use the device efficiently. This simplicity reduces the learning curve for new users and minimizes the time spent on administrative tasks;
- Accurate GPS Tracking: Users also commend the accuracy of the GPS tracking feature. Precise location data is essential for route planning, efficient navigation, and ensuring on-time deliveries. The ability to trust the device’s tracking capabilities enhances overall fleet management;
- Compliance Support: Positive feedback often includes mentions of how Rand McNally ELDs help users stay compliant with HOS regulations. The ease of generating compliance reports and logs simplifies the administrative burden, allowing drivers to focus on their primary task of safe and responsible driving.
Negative Feedback
While there are numerous positive aspects to Rand McNally ELDs, some users have expressed concerns and criticisms in their reviews:
- Customer Service: A recurring issue raised in negative feedback is the responsiveness of Rand McNally’s customer service. Some users have reported difficulties in obtaining timely assistance when encountering technical issues or needing support. This aspect can be frustrating, as quick resolutions are crucial for minimizing downtime in the trucking industry;
- Occasional Glitches: While reliability is a strong suit of Rand McNally ELDs, a minority of users have experienced occasional glitches or technical hiccups. These glitches can disrupt operations and lead to inaccuracies in data recording, potentially impacting compliance and efficiency.
Installation and Setup
Rand McNally ELDs are praised for easy installation. The process generally involves:
Step 1: Connecting the ELD to the Vehicle’s Diagnostic Port
The first crucial step in installing your Rand McNally ELD is connecting it to the vehicle’s diagnostic port. Follow these steps:
- Locate the vehicle’s diagnostic port, typically found under the dashboard on the driver’s side. It is usually a rectangular-shaped connector;
- Ensure that the vehicle is turned off and the ignition key is removed;
- Plug the Rand McNally ELD device into the diagnostic port. Make sure the connection is secure;
- Once connected, you can proceed to the next step.
Step 2: Downloading and Setting Up the Accompanying App
Rand McNally provides a user-friendly mobile app that complements their ELD hardware. To download and set up the app:
- Visit the app store on your smartphone, whether you are using an iOS or Android device;
- Search for “Rand McNally ELD” in the search bar;
- Locate the official Rand McNally ELD app and click on “Download” or “Install.”;
- Once the app is installed, open it;
- Follow the on-screen instructions to create an account or log in if you already have one;
- Pair your smartphone with the Rand McNally ELD device using the app. This step may require Bluetooth pairing; follow the prompts to complete the process.
Step 3: Syncing the Device with the App
After successfully connecting your Rand McNally ELD to your vehicle and downloading the app, it’s time to sync the device with the app. Follow these steps:
- Open the Rand McNally ELD app on your smartphone;
- Ensure that your smartphone’s Bluetooth is turned on;
- The app should detect your Rand McNally ELD device automatically. If not, follow the app’s instructions to manually connect the device;
- Once the device is detected, follow any additional on-screen prompts to complete the syncing process.
Troubleshooting Common Issues
Some users encounter issues. Here’s how to address common ones:
- Connectivity Problems: Check your device’s Bluetooth or internet connection;
- App Glitches: Restart the app or your phone to resolve temporary bugs.
Conclusion
Rand McNally ELD reviews indicate that these devices are a solid choice for commercial truckers. They blend user-friendliness with robust functionality, albeit at a premium cost. While there are areas for improvement, particularly in customer support, the overall consensus is that Rand McNally ELDs are a reliable, efficient tool for managing the demands of the road.
FAQ
Q: How much does a Rand McNally ELD cost?
A: Prices vary, but they are generally considered to be in the higher range.
Q: Are Rand McNally ELDs easy to install?
A: Yes, most users report an easy installation process.
Q: Can Rand McNally ELDs improve driving safety?
A: By ensuring HOS compliance, they help reduce driver fatigue and promote safer driving.
Q: What do users say about the Rand McNally ELD app?
A: Most find it user-friendly, though some report occasional glitches.
Q: Is customer support for Rand McNally ELDs reliable?
A: Reviews are mixed, with some users reporting excellent support and others experiencing delays.
The post Navigating the Digital Highways: A Deep Dive into Rand McNally ELD Reviews appeared first on ELD Drive.
]]>The post Don’t Rush on a Spare: Your Guide to Safe Speeds with a Spare Tire appeared first on ELD Drive.
]]>Understanding Spare Tires
Before we explore the speed aspect, let’s understand what a spare tire is. Typically, there are two types: full-size spares and donut spares (also known as compact or temporary spares). The type of spare you have significantly influences how fast you can drive with a spare tire.
| Type of Spare Tire | Durability and Function | Speed Consideration |
| Full-Size Spares | Similar to regular tires | With a full-size spare, you can usually drive at normal speeds, but it’s crucial to check the tire’s condition and air pressure. |
| Donut Spares | Smaller and lighter | Donut spares are not designed for long-term use or high speeds. They are meant to get you to a tire repair shop or your home, preferably within 50-70 miles. |
How Fast Can You Drive with a Spare Tire?
Donut Spares
Donut spares, also known as compact or space-saver spare tires, are temporary solutions designed for short-term use until a regular tire can be repaired or replaced. Due to their smaller size and reduced capabilities, driving with a donut spare requires specific considerations:
- Speed Limit: Generally, it’s recommended not to exceed 50 miles per hour (80 kilometers per hour) when driving with a donut spare. This speed limit is crucial for several reasons;
- Traction: Donut spares have less traction compared to regular tires. Their smaller contact patch with the road surface means they have less grip, particularly in adverse weather conditions such as rain or snow. Driving at excessive speeds can lead to reduced stability and handling;
- Sturdiness: Donut spares are not as robust as full-size tires. They are designed for short distances and lighter loads. Excessive speed can lead to overheating and potential damage to the spare tire;
- Handling: The handling of your vehicle can be affected when driving with a donut spare, especially during sudden maneuvers or emergency stops. Maintaining a moderate speed helps mitigate these handling issues.
Full-Size Spares
Spare tires that are full size, often called matching or standard spares, are functionally identical to the tires on your car. Although they are more stable and perform better than donut spares, there are a few things to keep in mind when driving with them:
- Speed Match: In most cases, you can usually match the speed of your regular tires when driving with a full-size spare. These tires are designed to provide similar performance and handling characteristics as your primary tires. However, caution is still advised;
- Consistency: To ensure safe and optimal performance when using a full-size spare, it’s essential that the spare tire is in good condition and matches the other tires in terms of tread depth and pressure. Mismatched tires can lead to handling problems;
- Regular Inspection: Full-size spares should be inspected regularly to ensure they are properly inflated, have sufficient tread depth, and are in good overall condition. This helps maintain consistency with your primary tires.
Impact on Driving

When asking, “How fast can you drive with a spare tire?” it’s also crucial to consider how a spare tire affects your vehicle’s performance:
- Handling: A donut spare can significantly alter how your car handles, especially in turns or harsh weather conditions;
- Braking: The difference in tire size can affect braking;
- Wear and Tear: An unmatched spare tire can put extra strain on your vehicle, leading to more wear and tear.
Safety Tips
Here are some safety tips to remember when you’re driving on a spare tire:
- Check Pressure: Always check the air pressure of the spare tire;
- Avoid Highways: If possible, stay off highways and stick to slower roads;
- No Overloading: Don’t overload your car when driving on a spare;
- Regular Checks: Inspect your spare tire regularly, even when it’s not in use.
Conclusion
Understanding how fast you can drive with a spare tire is crucial for your safety and the well-being of your vehicle. Always prioritize safety over speed, and remember that spare tires are a temporary solution. Regular checks and maintenance of your spare tire will ensure you’re prepared for those unexpected flat tire moments.
So, next time you find yourself with a spare tire, remember: it’s not a race. Drive safely, keep within the recommended speeds, and you’ll be on your way to a stress-free journey.
FAQ
Q: How long can I drive on a spare tire?
A: For a donut spare, try to limit use to 50-70 miles. A full-size spare can be used longer, but it’s best to replace or repair your regular tire as soon as possible.
Q: Can I use a spare tire from a different car?
A: It’s not recommended. Spare tires are specific to vehicle types and sizes for safety and performance reasons.
Q: Is it okay to drive a spare tire on the freeway?
A: While it’s not illegal, it’s safer to avoid high-speed roads, especially with a donut spare.
Q: Should I replace a donut spare with a full-size spare?
A: If you have the space and budget, a full-size spare is a better option for longer-term reliability.
The post Don’t Rush on a Spare: Your Guide to Safe Speeds with a Spare Tire appeared first on ELD Drive.
]]>The post The Savvy Buyer’s Route to Affordable ELDs appeared first on ELD Drive.
]]>Navigating the World of Cost-Effective ELDs
The Federal Motor Carrier Safety Administration (FMCSA) mandates the use of Electronic Logging Devices (ELDs) to accurately track and manage driving hours, ensuring safety and compliance with Hours of Service (HOS) regulations. While ELD adoption is mandatory, the good news is that acquiring this technology need not be a financial strain. Affordable ELD solutions have emerged as a viable and smart choice for fleets of all sizes. In this article, we will explore the pivotal role of cheap ELD devices in ensuring regulatory compliance and operational efficiency.
Regulatory Adherence
One of the primary reasons for adopting ELDs is to comply with FMCSA regulations. Affordable ELD devices offer a cost-effective way to meet these requirements. Let’s delve into the details:
- FMCSA Compliance: FMCSA mandates that commercial motor carriers must use ELDs to record HOS data. Cheap ELDs are designed to meet all FMCSA requirements, ensuring that your fleet operates within the law;
- Data Accuracy: Affordable ELDs are equipped with accurate and tamper-resistant technology, preventing drivers from altering their logs and ensuring the integrity of recorded data;
- Easy Installation: Many budget-friendly ELDs are plug-and-play solutions, simplifying the installation process and minimizing downtime;
- User-Friendly Interface: Despite their affordability, these devices often offer user-friendly interfaces that make it easy for drivers and fleet managers to access and understand the recorded data.
Budget-Friendly
Cost-effectiveness is a significant factor when considering ELD adoption. Here’s why affordable ELDs make financial sense for your fleet:
- Lower Initial Investment: Cheap ELDs are typically available at a fraction of the cost of high-end alternatives. This lower initial investment can significantly reduce the financial burden on fleet operators;
- No Hidden Costs: Many budget-friendly ELD solutions come with transparent pricing models, ensuring that there are no hidden or ongoing costs that could escalate over time;
- Scalability: Affordable ELDs are often designed to cater to fleets of all sizes. This scalability allows you to pay for the features and capabilities you need without unnecessary extras;
- Return on Investment (ROI): Despite their lower upfront cost, cheap ELDs can provide a substantial return on investment. Improved compliance, reduced paperwork, and optimized routes can lead to cost savings and increased efficiency;
- Maintenance and Support: While these devices may be budget-friendly, they often come with excellent customer support and regular software updates, ensuring that your ELD system remains reliable and up-to-date.
Key Features of Budget-Friendly ELDs
When considering budget-friendly Electronic Logging Devices (ELDs) for your fleet, it’s essential to know what features to expect. Contrary to common misconceptions, affordable ELDs can offer robust functionality without compromising on quality. In this section, we’ll delve into the core features of budget ELDs, highlighting that low cost doesn’t equate to low quality.
Accurate Logging
Accurate HOS recording is the cornerstone of ELD compliance. Budget-friendly ELDs provide precise logging capabilities, ensuring that your fleet adheres to regulatory standards without breaking the bank:
- HOS Compliance: These ELDs are designed to accurately track and record driver hours, reducing the risk of HOS violations and associated penalties;
- Tamper-Resistance: Affordable ELDs often employ tamper-resistant technology, preventing drivers from altering or falsifying their logs. This ensures data integrity and compliance;
- Automatic Recording: Many budget ELDs automate the recording process, reducing the potential for human errors and streamlining the compliance workflow;
- Real-time Alerts: Some budget ELDs offer real-time alerts to drivers and fleet managers, helping them stay informed about remaining driving hours and compliance status.
GPS Capabilities
GPS capabilities are crucial for fleet management, providing real-time location data and improving operational efficiency. Budget-friendly ELDs offer the following GPS-related features:
- Real-time Tracking: Affordable ELDs are equipped with real-time GPS tracking, allowing fleet managers to monitor the location of their vehicles at all times;
- Route Optimization: Some budget ELDs provide route optimization features, helping drivers choose the most efficient routes, which can reduce fuel consumption and improve delivery times;
- Geofencing: Geofencing capabilities enable the creation of virtual boundaries on maps. When a vehicle enters or exits these predefined areas, the ELD can send notifications, aiding in monitoring and security;
- Historical Data: Many budget ELDs store historical GPS data, allowing fleet managers to analyze past routes and driver behavior for improved decision-making.
User-Friendly Design
Ease of use is a critical aspect of any ELD system. Budget-friendly ELDs prioritize user-friendly design to ensure that drivers and fleet managers can efficiently interact with the system:
- Intuitive Interfaces: These ELDs feature intuitive and straightforward interfaces that require minimal training for drivers to operate effectively;
- Quick Installation: Budget ELDs are often designed for easy and quick installation, minimizing downtime and disruption to fleet operations;
- Accessible Data: Users can easily access recorded data, view logs, and generate reports without navigating complex menus, enhancing overall usability;
- Customer Support: Many budget-friendly ELD providers offer comprehensive customer support to assist with installation, troubleshooting, and any questions that may arise during usage.
Market Comparison of Affordable ELDs
This comparative analysis highlights some of the most cost-effective ELD devices available, complete with their prices and key features, aiding in an informed purchasing decision.
| Device Name | Price | Features | User Rating |
| ELD Basic One | $120 | HOS Logging, GPS, Basic Reporting | ★★★★ |
| ELD Economy Pro | $150 | Enhanced GPS, User-friendly Design | ★★★★☆ |
| ELD Value Plus | $200 | Advanced Reporting, Reliable GPS | ★★★★★ |
ELD Basic One
The ELD Basic One represents a cost-effective and practical solution, tailored for the needs of small to medium-sized fleets. This budget-friendly device, priced at an affordable $120, is designed to provide essential ELD functionalities without imposing a heavy financial burden. Let’s delve deeper into the key features of the ELD Basic One:
- Hours of Service (HOS) Logging: One of the cornerstones of this ELD is its HOS logging capability. By meticulously tracking driver hours and ensuring compliance with regulatory mandates, it shields your business from the specter of costly penalties and fines. Moreover, it promotes safer driving practices and helps prevent driver fatigue;
- GPS Tracking: The ELD Basic One elevates your fleet management by offering real-time GPS tracking. This feature allows you to keep a constant and precise eye on the location of your vehicles, empowering you with better control and decision-making abilities. It enhances route planning, assists in quick response to incidents, and boosts overall operational efficiency;
- Basic Reporting: While it may not rival the advanced reporting features of higher-tier options, the ELD Basic One still provides vital reporting capabilities. These include essential reports to help you manage your fleet effectively, such as mileage reports, driver performance summaries, and vehicle utilization data. These insights can be pivotal in optimizing your fleet’s performance and efficiency.
ELD Economy Pro
Stepping up the ladder, we encounter the ELD Economy Pro, priced at a reasonable $150. This model caters to businesses that require a more comprehensive set of tracking and reporting features. Here are the key aspects that set the Economy Pro apart:
- Enhanced GPS Tracking: The Economy Pro takes GPS tracking to the next level. It provides more precise and detailed location data, enabling you to make informed decisions regarding route optimization, delivery schedules, and vehicle maintenance. This heightened accuracy contributes to cost savings and improved customer service;
- User-friendly Design: A user-friendly interface is one of the hallmarks of the Economy Pro. It’s designed with the driver in mind, ensuring that the device is easy to operate. Minimizing the likelihood of errors, this user-centric approach fosters compliance and reduces the administrative burden on your staff;
- Advanced Reporting: The Economy Pro extends its reporting capabilities beyond the basics. It offers more detailed and customizable reports, allowing you to tailor the information to your specific needs. This in-depth reporting provides a deeper understanding of your fleet’s performance and driver behavior, paving the way for targeted improvements.
ELD Value Plus
For those seeking the pinnacle of ELD functionality, the ELD Value Plus is the premium choice, priced at $200. Geared towards larger fleets and businesses that demand comprehensive reporting and unwavering reliability, this top-tier device boasts the following exceptional features:
- Advanced Reporting: The ELD Value Plus is the ultimate reporting powerhouse. It offers a wide array of reporting options, including customizable reports that provide granular insights into your fleet’s performance. These insights can be leveraged to optimize routes, reduce fuel consumption, and enhance overall productivity;
- Reliable GPS Tracking: When it comes to GPS tracking, the ELD Value Plus sets a new standard. It features an exceptionally reliable GPS tracking system that ensures accurate location data at all times. Whether your vehicles are on the highway or in remote areas, you can trust that the ELD Value Plus will keep you connected;
- Comprehensive Compliance: This advanced ELD solution is designed to keep you in complete compliance with regulations. It not only tracks HOS but also provides alerts and notifications to ensure your drivers adhere to the rules. This proactive approach minimizes the risk of compliance violations and the associated penalties;
- Integration Capabilities: The ELD Value Plus is equipped with integration capabilities that allow it to seamlessly connect with other fleet management systems, software, and tools. This integration empowers you to centralize your fleet data, streamline your operations, and gain a holistic view of your business.
Installation and Set-Up Guidelines
Proper installation of your ELD device not only facilitates compliance with regulatory requirements but also plays a critical role in ensuring accurate data collection and the efficient operation of your fleet. We will delve into each aspect of installation in great detail, starting with:
Positioning of the ELD Device
The correct placement of your ELD device within the vehicle is a fundamental aspect of installation. An improperly positioned device can lead to inaccuracies in data recording and even non-compliance. To avoid such issues, follow these detailed positioning guidelines:
Table: Comprehensive ELD Device Positioning Tips
| Position | Description |
| Dashboard Mount | The ELD device should be securely mounted on the dashboard within the driver’s line of sight. This allows for easy access and visibility while driving. |
| Avoid Obstructions | Ensure there are no obstructions in front of the device, such as sun visors, hanging objects, or other accessories, that could block its view. |
| Stability is Crucial | To prevent the device from moving or falling while the vehicle is in motion, select a stable location for mounting. |
| Cable Management | Maintain a clean and organized setup by neatly routing and securing cables to prevent tangling or damage. |
| Unobstructed GPS Signal | To ensure accurate location tracking, the ELD device must have an unobstructed line of sight to the sky for a strong GPS signal. |
By adhering to these positioning guidelines, you can significantly enhance the performance of your ELD device, thus ensuring that it operates optimally for both compliance and operational purposes.
Mastering the Connection Process
Connecting the ELD device to your vehicle’s diagnostics port is a pivotal step in the installation process. An incorrect connection can lead to malfunctions and data inaccuracies. To avoid such complications, let’s explore the comprehensive steps for a proper connection:
- Locate the Diagnostics Port: Begin by locating the OBD-II (On-Board Diagnostics) port in your vehicle. Typically, you’ll find this port beneath the dashboard on the driver’s side;
- Power Off the Vehicle: Before starting the installation, ensure that the vehicle’s engine is turned off. This precautionary step helps prevent electrical issues during the connection process;
- Secure Connection: Carefully plug the ELD device into the OBD-II port, ensuring that it fits snugly and securely. A loose connection can lead to data transmission problems;
- Cable Management: Utilize zip ties or clips to secure both the ELD device and its cables. This prevents them from interfering with the vehicle’s operations, especially during rough road conditions;
- Indicator Light Verification: After connecting the ELD device, verify that its indicator lights illuminate correctly. These lights indicate whether the device is receiving power and communicating with the vehicle’s systems;
- Engine Start Test: Start the vehicle to confirm that the ELD device continues to function as expected while the engine is running. Pay close attention to any warning
By meticulously following these steps, you can establish a reliable and robust connection between your ELD device and the vehicle’s diagnostics port, ensuring smooth data transmission and accurate recording.
Activation and Configuration Demystified
Activation and configuration of your cheap ELD device represent the final pieces of the installation puzzle. These steps are essential to guarantee that the device accurately records and transmits the required data. Here is a detailed guide to navigate this process with confidence:
Table: Activation and Configuration Steps Demystified
| Step | Description |
| Power On | Begin by ensuring that the ELD device is powered on. Follow the manufacturer’s instructions for this step. |
| Choose Language | Select your preferred language for the device interface. Most ELD devices offer multiple language options. |
| Enter Vehicle ID | Enter your vehicle’s unique identification number, which is typically provided by the ELD provider. |
| Set Time Zone | To ensure accurate timestamping of data, choose the correct time zone corresponding to your geographical location. |
| Pair with Mobile App | If required, pair the ELD device with the accompanying mobile application as per the manufacturer’s instructions. |
| Test Connectivity | To verify the proper functioning of the ELD device, ensure it is successfully connected to the network and transmitting data accurately. |
It’s worth noting that activation and configuration procedures may vary slightly depending on the specific ELD device and software you have chosen. It is essential to follow the manufacturer’s instructions provided in the user manual to complete this process accurately.
User Perspectives on Affordable ELDs

User reviews are a crucial source of information when it comes to understanding the real-world advantages and limitations of budget-friendly Electronic Logging Devices (ELDs). In this section, we delve into the feedback from actual users to provide valuable insights into the practical aspects of using these affordable ELDs.
Advantages of Affordable ELDs
When it comes to affordable ELDs, users have identified several key advantages that make these devices a popular choice among trucking companies, particularly those operating on a tight budget. Here are the primary advantages:
Cost Savings
Cost savings stand out as the most significant advantage of opting for budget-friendly ELDs. Trucking companies, especially small and medium-sized businesses, appreciate the reduced upfront and ongoing costs associated with these devices. Here’s a breakdown:
| Cost Component | Affordable ELDs | Premium ELDs |
| Initial Hardware Cost | Lower | Higher |
| Monthly Subscription Cost | Affordable | Premium |
| Installation and Training | Easier and Cheaper | Extensive and Costly |
By choosing an affordable ELD solution, businesses can allocate resources more efficiently and achieve substantial cost savings over time.
Essential Features
Affordable ELDs are designed to provide essential features necessary for compliance with the Federal Motor Carrier Safety Administration (FMCSA) regulations. These features typically include:
- Electronic Logging: Recording hours of service (HOS) electronically, which helps prevent violations and fines;
- Real-time Tracking: Monitoring vehicle location and movement for improved fleet management;
- Driver Communication: Easy communication between drivers and dispatchers through the ELD system;
- Reporting: Generating necessary reports, such as HOS logs, for regulatory compliance.
These core functionalities ensure that businesses remain compliant without the need for unnecessary bells and whistles, making affordable ELDs a practical choice.
User-Friendly Interface
Many users have praised affordable ELDs for their user-friendly interfaces. These systems are often designed with simplicity in mind, allowing drivers and fleet managers to quickly adapt to the technology without extensive training. The intuitive nature of these devices reduces the learning curve and ensures that drivers can focus on their primary task: safe and efficient driving.
Limitations of Affordable ELDs
While there are notable advantages to using budget-friendly ELDs, it’s essential to be aware of their limitations as well. Here are some of the primary limitations users have reported:
Fewer Advanced Features
Affordable ELDs, by design, prioritize cost-effectiveness over advanced features. While they excel at providing essential functionalities, they may lack some of the advanced capabilities found in premium ELD solutions. These advanced features could include:
- Predictive Maintenance: High-end ELDs may offer predictive maintenance alerts based on vehicle diagnostics;
- Integrated Navigation: Some premium ELDs come with built-in GPS navigation for route optimization;
- Comprehensive Analytics: Advanced ELDs may offer in-depth data analysis tools for optimizing fleet performance.
Businesses with specific needs for advanced features should carefully consider whether the savings from budget-friendly ELDs outweigh the potential benefits of premium options.
Possible Durability Concerns
Affordable ELD hardware may raise durability concerns for some users. While they often cost less upfront, the materials and build quality may not be as robust as premium counterparts. This could potentially lead to increased maintenance or replacement costs over time.
To mitigate this limitation, it’s advisable for businesses to research the build quality and warranty offered by the ELD provider. Investing in slightly more durable hardware upfront may prove cost-effective in the long run.
Conclusion
While the cheapest ELD devices might not boast high-end features, they offer a practical, cost-effective solution for meeting ELD mandates. This guide aims to assist buyers in finding a dependable and affordable ELD device that fulfills basic fleet management needs without overstretching the budget. The key is to find the right balance between affordability and essential functionality in your ELD choice.
FAQ
What’s the typical cost range for an affordable ELD device?
Most cheap ELD devices are priced between $100 to $200.
How reliable are the cheapest ELD devices?
While they are budget-friendly, most affordable ELDs offer reliable basic functionality for compliance.
Are there hidden costs with low-priced ELDs?
Some devices might have extra fees for subscriptions or updates. It’s crucial to understand the total cost of ownership.
The post The Savvy Buyer’s Route to Affordable ELDs appeared first on ELD Drive.
]]>The post Navigating the Trails: Understanding 4×4 Low and Low Oil Light Signals appeared first on ELD Drive.
]]>Speed Limits in 4×4 Low
To strike the right balance between making progress and preserving your vehicle’s safety and control, it’s essential to understand the recommended speed range for 4×4 low mode.
The Optimal Speed Range: A Deliberate Choice
At first glance, the optimal speed for maneuvering in 4×4 low mode may seem like a narrow corridor, confined to the range of 5 to 15 miles per hour. However, this range is not arbitrarily defined; rather, it emerges as the result of a meticulous evaluation of numerous elements that converge to define the off-road experience. Let’s dissect the rationale behind this seemingly limited speed spectrum:
| Speed Range | Description |
| 5-10 mph | This range is ideal for the most challenging terrains nature has to offer, such as steep hills, rocky paths, and bottomless mud pits. At this pace, you gain unprecedented control over your vehicle, effectively mitigating the risk of damage while navigating hostile environments. |
| 10-15 mph | Falling within the upper echelons of the recommended speed range, this bracket is suited for slightly less treacherous terrains that still require high traction and control. It allows for steady progress while ensuring your vehicle remains safely within the bounds of safety |
Terrain Typified by Diversity: The Need for Versatility
One of the enthralling aspects of off-roading lies in the ever-changing terrain, each setting demanding a nuanced approach to speed:
- Steep Hills: Conquering steep inclines necessitates a cautious strategy, compelling you to adhere to the lower end of the recommended speed range—typically oscillating between 5 to 10 miles per hour. This deliberate pace grants your tires the opportunity to dig deep, securing optimal traction and reducing the risk of losing control during an arduous ascent;
- Rocky Paths: The rocky terrain introduces a distinct challenge. Maintaining a speed ranging from 10 to 15 miles per hour becomes more suitable in this context. This moderately higher velocity, still well within the prescribed range, allows your vehicle to deftly ‘float’ over the rocks, ensuring that control is maintained as you navigate the jagged labyrinth;
- Muddy Trails: Deep mud beds present a unique obstacle. When faced with such conditions, setting your sights on the lower end of the speed range (approximately 5 to 10 miles per hour) is a judicious choice. This measured pace acts as a safeguard against getting mired in the quagmire or subjecting your trusty steed to unwarranted harm.
Risks of High Speed in 4×4 Low
When it comes to off-roading in 4×4 low mode, the thrill of speed can be enticing. However, it is imperative to comprehend the associated risks and consequences of driving at excessive speeds in this mode. Let’s dissect the two primary risks: transmission strain and loss of control.
Transmission Strain
Driving at high speeds in 4×4 low mode exposes your vehicle’s transmission system to substantial strain. Here’s a closer look at this risk:
- Lower Gear Ratios: 4×4 low mode operates with lower gear ratios, primarily designed to deliver torque and control, not optimized for high-speed travel. These lower gear ratios provide increased power to your wheels, allowing them to overcome challenging terrain obstacles with ease. However, these ratios are ill-suited for high-speed driving;
- Overheating: When you push your vehicle beyond its intended capabilities by accelerating to high speeds in 4×4 low mode, the transmission system can rapidly overheat. This overheating can lead to a cascade of issues, including compromised lubrication, premature wear, and ultimately, costly transmission damage;
- Costly Repairs: Repairing or replacing a damaged transmission is a significant financial burden. Transmission repairs can easily run into thousands of dollars, making it essential to avoid subjecting your vehicle to the risks associated with high-speed 4×4 low driving.
Loss of Control
High speeds, especially when tackling challenging terrains, dramatically reduce your control over the vehicle. This diminished control can lead to dire consequences, including accidents and rollovers. Here’s a detailed look at this risk:
- Quick Movements: At high speeds, your vehicle becomes less responsive to quick movements, such as steering or braking. These movements can become erratic and unpredictable, making it challenging to navigate obstacles or sudden changes in terrain;
- Abrupt Maneuvers: On rough off-road terrain, there may be instances where you need to make abrupt maneuvers to avoid obstacles or regain control. At high speeds, these abrupt maneuvers become even riskier, as your vehicle’s suspension and tires struggle to cope with the demands placed upon them;
- Increased Likelihood of Accidents: The combination of reduced control, unpredictable movements, and challenging terrain significantly heightens the likelihood of accidents. Whether it’s losing traction on a slippery surface or encountering an unexpected obstacle, high-speed 4×4 low driving can lead to unfortunate and potentially dangerous situations.
The Low Oil Light: A Cautionary Signal
Understanding and responding to warning signals, such as the low oil light, is equally crucial for preserving your vehicle’s health and performance. Let’s delve into the significance of the low oil light, addressing common questions like “how long can you drive with the low oil light on” and emphasizing the importance of immediate action when this warning illuminates.
Understanding the Low Oil Light
When your vehicle’s low oil light suddenly appears on the dashboard, it serves as a critical signal that demands immediate attention. Here’s a detailed breakdown of this warning:
- Immediate Action Required: The low oil light is not to be taken lightly. It’s a clear indication that your engine is running with insufficient oil, and you must respond promptly;
- Risks of Ignoring: Ignoring the low oil light is a risky gamble. Insufficient oil levels can result in significant engine damage, potentially leading to costly repairs or even engine replacement.
Responding to the Low Oil Light
Now that we’ve established the urgency associated with the low oil light, let’s explore the steps you should take when this warning signal activates:
- Check Oil Level: When the low oil light illuminates, your first course of action should be to stop your vehicle safely and check the oil level. Consult your vehicle’s owner’s manual for specific instructions on how to do this;
- Limit Driving: Ideally, driving with the low oil light on should be limited or, if possible, avoided altogether until the issue is resolved. Continuing to operate your vehicle with insufficient oil can result in severe engine damage due to increased friction and heat;
- Top Up Oil: If you find that your oil level is indeed low, you should top it up immediately with the recommended type and grade of motor oil. Ensure that you do not overfill the oil, as this can also cause problems;
- Seek Professional Assistance: If you are unable to locate the source of the low oil issue, or if the warning light persists even after adding oil, it is advisable to seek the expertise of a professional mechanic. They can diagnose the problem, fix any leaks, and ensure that your vehicle’s engine is in proper working condition.
Balancing Speed and Safety in 4×4 Low
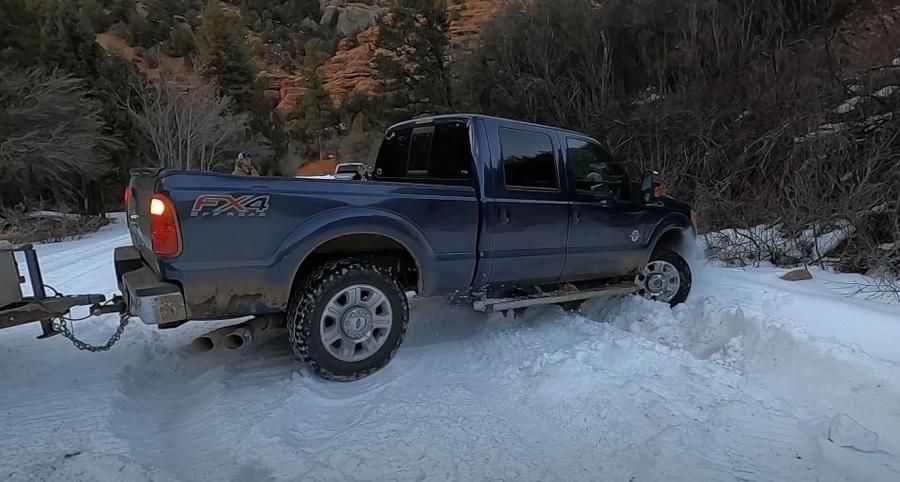
Driving in 4×4 low mode requires a different set of skills and strategies compared to regular driving. To ensure both speed and safety, consider the following best practices:
Slow and Steady
The primary principle of driving in 4×4 low is to maintain a slow and controlled pace. Here’s why:
- Traction: 4×4 low provides maximum traction to all four wheels. This extra grip allows you to crawl over obstacles and rough terrain with ease. However, it doesn’t make your vehicle faster; it ensures you have the power to overcome obstacles without spinning your wheels;
- Torque: The low gear ratio in 4×4 low multiplies engine torque to the wheels. This is especially useful when ascending steep inclines or navigating through deep mud or snow. Slow and steady acceleration ensures that you can harness this torque effectively;
- Control: At slower speeds, you have better control over your vehicle. You can make precise maneuvers, avoid sudden jerks or jolts, and minimize the risk of accidents.
Awareness of Surroundings
Being extra vigilant about your surroundings is vital when driving in 4×4 low mode:
- Terrain Assessment: Continuously assess the terrain ahead and anticipate potential challenges. Look out for rocks, tree roots, ditches, or soft patches that could impede your progress;
- Obstacle Recognition: Identify obstacles like boulders, fallen trees, or deep ruts. Plan your path to navigate around or over them safely;
- Spotter Communication: If you have a spotter or another person with you, maintain clear and constant communication. They can provide valuable guidance, helping you avoid obstacles or adjust your route.
Proper Gear Selection
Ensure that you’re in the appropriate gear when driving in 4×4 low. Generally, it’s best to use first or second gear to maintain the necessary low speed and high torque. Avoid high gears, as they can cause your vehicle to lose traction and control.
Braking Techniques
Braking in 4×4 low mode requires a delicate touch:
- Engine Braking: Whenever possible, rely on engine braking by lifting your foot off the accelerator pedal. This allows the engine to slow the vehicle down without locking up the wheels;
- Gentle Braking: If you need to use the brakes, apply them gently and progressively. Sudden or aggressive braking can lead to skidding or loss of control, especially on slippery surfaces.
Maintain Momentum
While it’s essential to go slow, maintaining momentum is also crucial in some situations:
- Uphill Climbs: When ascending steep inclines, a controlled and steady pace helps maintain traction. Avoid coming to a complete stop, as it can be challenging to start moving again on a hill;
- Mud and Sand: In soft terrain like mud or sand, maintaining a steady forward motion prevents your vehicle from getting stuck. Use gentle throttle inputs to keep moving.
Conclusion
Understanding how fast you can drive in 4×4 low and responding to the low oil light are essential for safe and effective vehicle operation. Always prioritize safety and vehicle health to ensure a smooth journey, no matter the terrain. Remember, when in doubt, slow down and check your oil!
FAQ
Q: How fast can you drive in 4×4 low?
A: It’s best to keep speeds between 5 to 15 mph, depending on the terrain.
Q: How long can you drive with low oil light on?
A: You should check your oil level immediately and ideally not drive until the issue is resolved.
Q: How long can I drive with low oil light?
A: Driving should be limited as much as possible until you can add oil or get the vehicle serviced.
The post Navigating the Trails: Understanding 4×4 Low and Low Oil Light Signals appeared first on ELD Drive.
]]>The post Navigating the Drive After Resetting Your Check Engine Light appeared first on ELD Drive.
]]>Understanding the Check Engine Light
Before we discuss the mileage requirements, it’s essential to understand what the check engine light indicates. This light is part of your car’s onboard diagnostics system (OBD-II), which monitors your vehicle’s performance. When it detects a problem, the light comes on, signaling that something needs attention.
Common Reasons for the Check Engine Light to Illuminate
The check engine light can be triggered by a wide range of issues, each of which is associated with a specific diagnostic trouble code (DTC). These issues can include, but are not limited to:
| Common Car Issues | Description |
| Faulty Oxygen Sensors | Oxygen sensors monitor the level of oxygen in your exhaust gases, helping to maintain optimal fuel-to-air ratio. A malfunctioning oxygen sensor can lead to decreased fuel efficiency and increased emissions. |
| Loose or Damaged Gas Cap | A loose or damaged gas cap can cause fuel vapor to escape from the fuel tank, triggering the check engine light. |
| Faulty Mass Airflow Sensor | This sensor measures the amount of air entering the engine and plays a crucial role in determining the correct air-fuel mixture. A malfunctioning mass airflow sensor can lead to reduced engine performance and increased fuel consumption. |
| Catalytic Converter Issues | Problems with the catalytic converter can result in increased emissions and reduced engine efficiency. |
| Ignition System Problems | Faulty spark plugs, ignition coils, or other ignition system components can lead to misfires, which can trigger the check engine light. |
| Engine Misfires | Misfires can be caused by a variety of factors, including worn spark plugs, fuel delivery issues, or sensor failures. |
| Exhaust Gas Recirculation (EGR) System Malfunctions | Issues with the EGR system can result in increased emissions and reduced engine performance. |
Why Reset the Check Engine Light?
It is imperative that the check engine light be reset when the underlying problem that caused it to illuminate has been addressed and fixed. It is essential to reset the check engine light as part of the repair process for a number of reasons, including the following:
- Verification of Repair: Resetting the check engine light allows you to verify that the issue has been successfully resolved. It ensures that the vehicle’s onboard computer registers the repair and monitors the system for any recurring problems;
- Passing Emissions Tests: Many states require emissions testing for vehicle registration and renewal. A lit check engine light will result in an automatic failure. Resetting the light after repairs is necessary to pass emissions tests;
- Improved Vehicle Performance: When the check engine light is on, the engine may go into a “limp mode” to conserve power and impair fuel efficiency. The engine will run normally after the light is reset.
How Far Should You Drive After Resetting Your Check Engine Light?
After resetting the check engine light, a common question that arises is, “How many miles do I need to drive to ensure the issue is truly resolved?” The answer to this question can vary based on several factors, including the specific problem that triggered the light and your vehicle’s make and model. To gain a clearer understanding, let’s break down some key considerations:
- Drive Cycle: Most modern vehicles require completing a specific drive cycle to reevaluate the various systems and sensors. This drive cycle typically involves a combination of city and highway driving and may require several trips;
- Oxygen Sensor and Catalyst Monitors: If the issue involved the oxygen sensors or catalytic converter, you may need to drive for a significant distance (typically 50-100 miles) to allow these systems to complete their monitoring and testing cycles;
- Readiness Monitors: The engine control module (ECM), which is your car’s onboard computer, also has readiness monitors that need to be restarted. These monitors check a number of systems in your car, such as the pollution control system. The number of miles needed to reset readiness monitors can be different, and you may need to drive in certain circumstances, like cruising on the highway or driving in stop-and-go traffic;
- Consult the Repair Manual: For precise information regarding the drive cycle and readiness monitor reset requirements for your specific vehicle, consult the manufacturer’s repair manual or a trusted mechanic. They can provide you with the most accurate guidance tailored to your car’s make and model.
The Post-Reset Drive: How Many Miles?

The mileage range of 30 to 100 miles is not arbitrary but based on the concept of a “drive cycle.” A drive cycle is a standardized set of operating conditions that your vehicle must go through to evaluate and test all the emissions systems and sensors thoroughly. These conditions encompass various driving scenarios, including highway and city driving, idling, and maintaining different speeds.
What is a Drive Cycle?
A drive cycle is essentially a series of specific conditions and driving scenarios that your car must undergo to ensure that all the emissions-related systems are functioning optimally. The drive cycle is designed to mimic real-world driving conditions, allowing the vehicle’s onboard computer to perform comprehensive checks.
Key Elements of a Drive Cycle
A typical drive cycle consists of the following key elements:
- Cold Start: The cycle begins with a cold start, where the engine has been off for an extended period. This phase allows the vehicle to assess how well it starts and manages emissions during initial operation;
- City Driving: Part of the drive cycle involves low-speed, stop-and-go city driving, simulating urban driving conditions. This phase evaluates emissions control during short trips and frequent stops.
- Highway Driving: To assess emissions under higher-speed, constant cruising conditions, the drive cycle includes a segment of highway driving. This phase ensures that emissions systems are functioning correctly during extended highway trips;
- Idle Time: The vehicle needs to idle for a specific duration to test emissions performance when the engine is at rest;
- Speed Variation: The drive cycle may require the vehicle to operate at different speeds, including both low and high speeds. This variation tests how emissions systems respond to changing conditions.
Why the Range of 30 to 100 Miles?
The range of 30 to 100 miles is recommended because it allows your vehicle to complete a full drive cycle under a variety of real-world driving conditions. Some emissions systems and sensors may require more extensive testing, and certain vehicles may have longer or more complex drive cycles than others. Here’s a breakdown of why this range is recommended:
- Completing the Drive Cycle: Some vehicles may require more miles to complete the entire drive cycle and test all emissions systems thoroughly. This is especially true for newer vehicles with advanced emissions control technology;
- Ensuring Accuracy: By driving within the 30 to 100-mile range, you increase the likelihood of all systems being tested accurately. It provides a buffer to account for variations in driving conditions and vehicle performance;
- Readiness Monitors: The drive cycle is also necessary for resetting readiness monitors. These monitors assess various systems within your vehicle, including emissions control, and they need to be in the “ready” state to pass emissions tests during vehicle inspections.
Factors Influencing the Required Mileage
Several factors can influence “how many miles do I need to drive after resetting my check engine light.” These include:
Vehicle Make and Model
The make and model of your vehicle play a significant role in determining the required mileage after resetting the check engine light. Different manufacturers may have varying drive cycle requirements, and these requirements can also differ between models from the same manufacturer.
Table: Examples of Varied Mileage Requirements by Vehicle Make
| Vehicle Make | Mileage Requirement After Resetting Check Engine Light |
| Ford | 50 to 100 miles |
| Toyota | 30 to 60 miles |
| Honda | 40 to 80 miles |
| Chevrolet | 60 to 120 miles |
| BMW | 70 to 140 miles |
As shown in the table above, the mileage requirements can vary widely among different vehicle makes. It is essential to consult your vehicle’s manufacturer-specific documentation or consult a mechanic familiar with your car’s make and model for precise guidance.
Type of Repair
The nature of the repair or fix performed on your vehicle can significantly affect the required mileage after resetting the check engine light. Some repairs may involve specific systems or components that require more extensive testing, resulting in a longer drive cycle.
Table: Mileage Variations Based on the Type of Repair
| Type of Repair | Mileage Requirement After Resetting Check Engine Light |
| Oxygen Sensor Replacement | 30 to 60 miles |
| Catalytic Converter Repair | 80 to 120 miles |
| Ignition System Repair | 50 to 90 miles |
| EGR System Fix | 40 to 70 miles |
| Fuel System Adjustment | 60 to 100 miles |
Table above illustrates how the type of repair can influence the mileage needed to complete the drive cycle. More complex repairs may require a more extended period of driving to ensure that all related systems are functioning correctly.
Driving Conditions
The mix of driving conditions, including highway and city driving, is a crucial factor in determining the required mileage after resetting the check engine light. A balanced combination of both types of driving is often essential to simulate real-world driving scenarios.
Table: Influence of Driving Conditions on Mileage Requirements
| Driving Conditions | Mileage Requirement After Resetting Check Engine Light |
| Mostly Highway Driving | 30 to 50 miles |
| Balanced Highway and City Mix | 50 to 80 miles |
| Mostly City Driving | 80 to 100 miles |
| Stop-and-Go Traffic | 90 to 120 miles |
Table above demonstrates that the driving conditions you encounter post-reset play a vital role in determining the mileage needed. A mix of highway and city driving is often recommended as it subjects your vehicle to a broader range of operating conditions.
Tips for a Successful Post-Reset Drive
To ensure a successful post-reset drive, it is crucial to follow a set of essential tips that can optimize your vehicle’s performance and maintain its overall health. These guidelines can help you make the most out of your drive cycle reset and avoid potential issues in the long run.
Vary Your Speeds
One of the primary steps to a successful drive cycle reset is to incorporate a combination of highway and city driving. This diversity in driving conditions allows your vehicle’s engine and emissions systems to undergo a complete cycle of operation. It helps in clearing any diagnostic trouble codes (DTCs) and ensuring that all onboard monitors are fully tested. By driving on the highway, you activate the oxygen sensor and catalyst monitor, while city driving engages the evaporative system monitor and others. This variation ensures that your vehicle’s emission control system is thoroughly tested and ready for an emissions inspection.
Warm-Up Your Car
Before embarking on your drive, it’s essential to allow your vehicle’s engine to warm up properly. This ensures that the engine reaches its normal operating temperature, which is vital for the accurate functioning of the emissions control system. During warm-up, the engine computer calibrates various sensors and systems, such as the oxygen sensors, which are crucial for monitoring the air-fuel mixture. Without proper warm-up, these sensors may not provide accurate readings, potentially leading to emission test failures. Allow your vehicle to idle for a few minutes until the engine reaches its normal operating temperature to ensure an effective drive cycle reset.
Avoid Short Trips
Short trips can be detrimental to the success of your drive cycle reset. During short drives, your vehicle may not have enough time to complete the necessary emission control system tests. Some monitors require specific driving conditions and distances to activate and complete their tests. If you frequently engage in short trips, these monitors may remain in a “not ready” state, which can result in a failed emissions inspection. To overcome this issue, try to combine short trips into longer ones or plan your drives to include both city and highway routes, as previously mentioned. This way, your vehicle can perform the required tests and ensure a successful drive cycle reset, allowing you to pass an emissions inspection with ease.
Conclusion
So, “How many miles do I need to drive after resetting my check engine light?” While the answer varies, understanding your vehicle’s requirements and ensuring a proper mix of driving conditions will prepare you for a successful inspection. Remember, mileage matters, but so does how you drive those miles!
FAQ
Q: How many miles do I need to drive after resetting my check engine light for a standard sedan?
A: Typically, 40-60 miles should suffice for a standard sedan.
Q: Can driving conditions affect how many miles I need to drive after resetting my check engine light?
A: Yes, a mix of city and highway driving is often necessary to complete a drive cycle.
Q: What happens if I don’t drive enough miles after resetting the check engine light?
A: Your vehicle may not complete its drive cycle, potentially leading to issues during inspection.
The post Navigating the Drive After Resetting Your Check Engine Light appeared first on ELD Drive.
]]>The post Miles to Go: Navigating with the DEF Light On appeared first on ELD Drive.
]]>Understanding the DEF System
Before tackling the main question, it’s essential to understand what the DEF system is and why it’s important.
What is DEF?
DEF, short for Diesel Exhaust Fluid, represents a transformative innovation in the realm of diesel engine technology. It is a precise blend consisting of urea and deionized water, meticulously engineered to serve as a potent weapon against the perilous scourge of nitrogen oxide (NOx) emissions. In modern diesel engines, DEF plays the role of a catalytic agent that orchestrates a chemical dance in the exhaust stream, reducing harmful emissions to a benign mixture of nitrogen and water vapor.
Composition of DEF:
- Urea: Urea, the organic compound at the heart of DEF, is a colorless, odorless, and non-toxic substance, which makes it an ideal candidate for emission reduction. It contains 32.5% nitrogen by weight, a critical element in the NOx reduction process;
- Deionized Water: The other primary component of DEF is deionized water. This type of water has had its ions, both positive and negative, removed through a process called deionization. The purity of deionized water is paramount, as any impurities could disrupt the chemical reactions within the DEF system.
How Does DEF Work?
Understanding the inner workings of DEF is pivotal to appreciating its role in emission reduction. The DEF system operates by introducing DEF fluid into the hot exhaust gases expelled from a diesel engine. This intricate process involves several key components:
- DEF Tank: The DEF tank, typically located adjacent to the fuel tank, serves as the reservoir for DEF fluid. It is equipped with a heating element to prevent freezing in cold climates.
- DEF Injector: A dedicated DEF injector sprays the DEF fluid directly into the exhaust stream in precise quantities. The rate of injection is meticulously controlled by the vehicle’s electronic control unit (ECU);
- Chemical Reactions: As DEF is vaporized in the hot exhaust gases, it undergoes a complex chemical transformation. The urea in DEF decomposes into ammonia (NH3) and carbon dioxide (CO2). Subsequently, the ammonia reacts with the nitrogen oxides (NOx) in the exhaust, breaking them down into harmless nitrogen (N2) and water vapor (H2O);
- SCR Catalyst: The Selective Catalytic Reduction (SCR) catalyst, positioned downstream in the exhaust system, facilitates the chemical reactions between DEF and NOx emissions, ensuring efficient reduction of harmful pollutants.
By comprehending this process, one can appreciate the pivotal role that DEF plays in reducing NOx emissions—a critical step toward achieving compliance with stringent environmental regulations and enhancing overall air quality.
The DEF Indicator Light: A Critical Alert Mechanism
In the context of diesel vehicles equipped with a DEF system, the DEF indicator light assumes significant importance. This indicator light is a pivotal component of the vehicle’s instrumentation panel and serves as an alert mechanism for the driver. Understanding its operation and significance is crucial for any diesel vehicle owner or operator:
- Low DEF Warning: When the DEF level in the tank becomes insufficient, the DEF indicator light will illuminate on the dashboard. This serves as a timely warning to the driver that it’s time to refill the DEF tank to ensure the continued operation of the emissions control system;
- Limited Engine Performance: In some vehicles, a low DEF level may trigger a reduction in engine performance. This is a safeguard mechanism to prevent the vehicle from operating without proper emission control;
- No Restart After Depletion: In certain situations, if the DEF tank becomes completely empty, the vehicle may not restart after being shut off. This is another measure to ensure compliance with emissions regulations and to encourage timely DEF refilling.
The Significance of DEF: Environmental Impact and Compliance
The significance of DEF extends far beyond the confines of a diesel engine’s components. It resonates with broader environmental and regulatory implications:
- Reducing Environmental Footprint: DEF enables diesel engines to significantly reduce their environmental footprint by curbing harmful nitrogen oxide emissions. This reduction directly contributes to cleaner air quality and a healthier environment;
- Emissions Regulations: In response to the pressing need for environmental protection, regulatory bodies like the Environmental Protection Agency (EPA) have established stringent emissions standards. DEF is a pivotal tool for diesel engine manufacturers to meet these stringent requirements, particularly the EPA’s Tier 4 standards.
Best Practices for DEF Maintenance and Usage
To conclude this extensive guide, it is essential to outline some best practices for DEF maintenance and usage:
- Quality DEF Fluid: Always use high-quality DEF fluid that meets the ISO 22241 standards. Using subpar DEF can compromise the efficiency of the DEF system;
- Proper Storage: Store DEF fluid in a cool, dry place, away from direct sunlight. Avoid contamination of the DEF fluid, as even small impurities can hinder its effectiveness;
- Regular Refilling: Monitor the DEF fluid level in the tank and respond promptly to the DEF indicator light. Timely refilling ensures uninterrupted operation and prevents engine performance degradation;
- Cold Weather Considerations: In cold climates, ensure that the DEF tank remains heated to prevent freezing. Use DEF heaters and maintain appropriate insulation.
How Far Can You Drive with DEF Light On?

Now, back to our primary concern: how far you can drive once that DEF light comes on. It’s a critical question, especially if you’re miles away from the nearest service station.
Factors Affecting Distance
Several key factors come into play when determining how far you can drive with the DEF light illuminated:
- Vehicle Model: Different diesel vehicles consume DEF at varying rates. The rate of DEF consumption is influenced by the vehicle’s engine size, emission control technology, and overall design. Some vehicles may have more efficient DEF utilization than others, allowing for longer distances with the DEF light on;
- Driving Conditions: The type of driving conditions you encounter can significantly impact DEF consumption. Highway driving typically results in more efficient DEF usage compared to stop-and-go city driving. This is because highway driving generally involves more consistent engine operation and exhaust system temperatures, leading to optimized DEF conversion;
- DEF Tank Capacity: The size of your vehicle’s DEF tank plays a crucial role in determining the distance you can cover with the DEF light on. Vehicles equipped with larger DEF tanks naturally have the capacity to cover more miles before needing a refill.
General Guidelines
While the specific distance you can travel with the DEF light on may vary depending on the factors mentioned above, there are some general guidelines to keep in mind:
- Initial Warning: When the DEF light first illuminates on your dashboard, it typically indicates that the DEF fluid level is getting low. At this stage, you can usually continue driving for approximately 10-20% of your average driving range. For example, if your vehicle typically covers 500 miles on a full tank of DEF, you can expect to travel an additional 50 to 100 miles after the light comes on. However, it’s essential not to push the limit too far to avoid running out of DEF completely;
- Reduced Performance Stage: In some diesel vehicles, as the DEF level continues to decrease, the engine may enter a reduced performance mode to conserve DEF. This is a protective measure to ensure that the vehicle complies with emissions regulations. During this stage, your vehicle’s performance may be limited, and it is highly advisable to seek DEF replenishment as soon as possible to avoid any potential inconvenience.
Table: Examples of DEF Tank Capacities
| Vehicle Model | DEF Tank Capacity (Gallons) |
| Compact Diesel Car | 2.5 |
| Midsize Diesel SUV | 4.0 |
| Heavy-Duty Diesel Truck | 10.0 |
| Commercial Bus | 15.0 |
These examples illustrate how DEF tank size can vary significantly between vehicle types, affecting the distance you can drive with the DEF light on.
Preventive Measures

When it comes to managing the Diesel Exhaust Fluid (DEF) system in your diesel vehicle, taking preventive measures is crucial to ensure you never find yourself in a situation where the DEF light catches you off-guard. Here are some detailed preventive measures to consider:
Regular Checks
- Routine DEF Level Checks: A fundamental and proactive measure is to regularly monitor your DEF fluid levels. This can be easily accomplished by referring to your vehicle’s DEF gauge on the dashboard or accessing the DEF level information through the vehicle’s information system. Pay special attention to DEF levels before embarking on long trips or journeys. Ensuring that your DEF tank is adequately filled prior to extended drives can preemptively prevent the need for an emergency DEF refill;
- Scheduled Maintenance: Incorporate DEF level checks into your vehicle’s scheduled maintenance routine. During routine service appointments, have your DEF system thoroughly inspected, and the fluid topped off as necessary. This practice not only maintains your DEF system’s efficiency but also ensures that you are always prepared for your next journey, whether it’s a short commute or a cross-country expedition.
Understanding Your Vehicle
- Know Your Vehicle’s DEF Consumption Pattern: Different diesel vehicles exhibit varying DEF consumption patterns. Understanding how your specific vehicle utilizes DEF is invaluable. You can find this information in your vehicle’s owner’s manual or by consulting with your vehicle manufacturer or dealer. Knowing your vehicle’s DEF consumption rate allows you to estimate how far you can travel before needing a refill once the DEF light comes on;
- Monitor DEF Usage: Some modern vehicles provide detailed information about DEF usage through the vehicle’s information system. Monitor this data regularly to gauge how quickly your vehicle consumes DEF under different driving conditions. This knowledge empowers you to plan ahead and schedule DEF refills more effectively;
- DEF Fluid Storage: Ensure proper storage of DEF fluid to maintain its quality. Store DEF in a cool, dry place, away from direct sunlight, and keep the container tightly sealed. Quality DEF is essential for efficient emissions reduction;
- Cold Weather Precautions: In regions with cold climates, take precautions to prevent DEF from freezing. DEF has a freezing point of approximately 12°F (-11°C). Ensure that your DEF tank is equipped with a heating element to keep the fluid from solidifying. Additionally, consider using DEF additives designed to lower the freezing point further;
- Use Approved DEF: Always use DEF that meets the ISO 22241 standards. Using non-compliant or low-quality DEF can adversely affect the performance of your DEF system and may lead to more frequent refills.
Conclusion
Understanding how far you can drive with the DEF light on is vital for diesel vehicle owners. While there’s some wiggle room once the light comes on, it’s crucial not to push your luck too far. Regular maintenance and awareness of your vehicle’s DEF needs can save you from potential trouble on the road.
Remember, when that DEF light flickers on, it’s not just a suggestion – it’s a call to action.
FAQ
Can I ignore the DEF warning light?
Ignoring it can lead to reduced engine performance or even a vehicle shutdown.
How often should I refill the DEF tank?
It depends on your vehicle and driving habits, but generally, it’s good to check every 5,000 miles.
Is it safe to drive with the DEF light on?
It’s safe for a short period, but it should be addressed as soon as possible.
Can I refill the DEF tank myself?
Yes, DEF is available at auto parts stores and service stations.
The post Miles to Go: Navigating with the DEF Light On appeared first on ELD Drive.
]]>